Table of Contents
Sheet Metal Coating Adhesion Issues: 5 Proven Solutions
Sheet metal coating peeling not only compromises aesthetics but also exposes bare metal to corrosion, accelerating equipment wear and reducing service life.
Insufficient coating adhesion stems from complex factors, including inadequate surface preparation techniques, environmental corrosion, physical damage, or subpar paint quality.
This article delves into the root causes of weak adhesion and provides actionable solutions for poor adhesion of sheet metal coatings, guiding you through effective repair techniques, proactive maintenance strategies, and professional restoration methods to resolve coating failures and preserve both the durability and appearance of your sheet metal components.
- Betty
Table of Contents
Step 1 : Surface Preparation for Better Adhesion
Ultimately, surface preparation is critical. Sheet metal surfaces may contain oil contamination, rust, or oxidation layers – all of which can compromise coating adhesion. “To address this,” operators must verify pretreatment processes including degreasing, abrasive cleaning, and phosphating conversion coating.
By implementing comprehensive surface treatment solutions, manufacturers can systematically resolve poor adhesion in sheet metal coatings. For instance, abrasive blasting to a Ra of 2.5-5μm creates a textured surface that significantly improves coating adherence.
The surface treatment stage is the primary cause of poor adhesion of the sheet metal coating, which involves multiple aspects. We need to adopt corresponding solutions based on specific problems.
Contaminant Residues
Oil/Grease Removal
First apply alkaline degreaser to eliminate oil contaminants before proceeding with surface profiling via abrasive blasting or grinding.
Post-cleaning, we inspect surfaces using the water break test: beaded water droplets indicate residual contamination, requiring repeated cleaning cycles until achieving uniform sheeting.
Rust Mitigation Protocol
For rust, we generally use a combination of mechanical and chemical methods for graded treatment.
Grade A (No rust):
Perform mechanical polishing followed by solvent degreasing
Grade B (Spot rust):
Execute abrasive sanding (80-120 grit) with subsequent phosphating conversion coating
Grade C (Sheet rust):
Conduct abrasive blasting (SA 2.5 standard) paired with inhibited acid pickling
Tips:
Apply protective coatings within 24 hours post-phosphating
Complete coating application within 4 hours after blasting to prevent flash rusting
Salt/Dust Elimination
Execute precision cleaning with ultrahigh-pressure water jets for salt removal in crevices
Conduct final decontamination using ionized air knives immediately before coating
Insufficient Surface Activation
Core causes of insufficient surface activation include incomplete oxide layer removal and inadequate conversion coating formation.
Solutions:
Steel and other ferrous substrates, nano-composite phosphating provides deep oxide layer removal and micro-structural surface activation.
Aluminum alloys, chrome-free passivation processes effectively eliminate residual oxides while forming a dense, corrosion-resistant conversion coating.
Failure of Physical Anchoring Mechanisms
Core causes include roughness mismatch (Ra < 2μm or > 8μm) and surface structural defects.
- Optimization of laser etching technology:
In optimizing 355nm UV laser etching, a 20kHz frequency and 15mm/s scanning speed precisely fabricate 30μm-deep, 150μm-spaced microgrooves: the 30μm depth effectively embeds coating resin while the 150μm spacing prevents stress concentration.
Compared with traditional sandblasting (Ra 5μm), this configuration enhances impact resistance by 40% as tested under ISO 6272 standards. - Optimization of sandblasting process:
Alumina, as a coarse abrasive, can provide high surface roughness. Glass beads, as a fine abrasive, can reduce surface micro – cracks. Using a mixture of these two abrasives can improve the surface adhesion by 20 – 30% compared to using a single abrasive.
Improper Substrate Pretreatment
Root Cause Analysis
Improper substrate pretreatment, particularly galvanized layer damage and excessive aluminum alloy corrosion, is a leading cause of coating adhesion failure.
Solution Strategy
For galvanized steel substrates:
Degreasing + ceramic conversion coating treatment removes oils and forms a crystalline zinc phosphate conversion coating (thickness: 2-3μm), restoring galvanized layer integrity.
For aluminum alloys:
Micro-arc oxidation (MAO) generates a ceramic-like oxide layer through electrolytic plasma reactions.
Failure Cases
The Whole Coating of the Galvanized Sheet Falls Off
Failure Phenomenon:
100% coating detachment in cross-cut test, clean interface with no coating residue (EDS detection shows no Cr/Zr elements).
Root Causes:
Ceramic conversion treatment was not performed (no Zr-O-Zn chemical anchor points formed on the galvanized layer).The primer did not contain silane coupling agent.
Solutions:
Add ceramic conversion treatment + silane sealing.Use a matching water-based acrylic-silane primer (KH560 content: 2%).
Cold-Hot Cycle Delamination of Cold-Rolled Steel Coatings
Failure Manifestation:
After undergoing 10 cycles between -40°C and 85°C, the edges of the coating delaminate, and red rust appears at the interface.
Underlying Causes:
The phosphating film is discontinuous, with a porosity exceeding 5%. Additionally, the absence of a surface – conditioning process using colloidal titanium salt leads to the formation of coarse crystals.
Solution Approach:
A nano – composite phosphating process is employed. By adding nanoscale TiO₂ particles as crystal nucleus refining agents, the crystal size of the phosphating film is regulated to fall within the range of 1 – 3 μm.
With an optimized film thickness of 3.2 g/m², this process achieves a low porosity of 2.1%. Compared to traditional processes, the porosity is reduced by 58%. As a result, it effectively hinders the penetration paths of corrosive media and enhances the interfacial adhesion of the coating.
Step 2 : Best Coatings for Sheet Metal Adhesion
The compatibility between the substrate and the coating is the key foundation for adhesion. For example, there are substantial differences in the primer systems for galvanized steel and plain carbon steel.
Have users chosen coating types with excellent adhesion performance? It is recommended to give priority to epoxy or polyurethane systems, as these types of coatings generally have stronger bonding force with the substrate. Additionally, it is necessary to check whether the coating’s construction parameters (mixing ratio, viscosity) comply with the product instructions and confirm that the coating has not expired.
Only by systematically considering these factors during the material selection stage can the adhesion performance of the sheet metal coating be guaranteed from the source.
Coating Selection Process for Sheet Metal Adhesion
- Identify Substrate Type
- Select Appropriate Primer
- Check Primer Shelf Life
- Verify Topcoat Compatibility
- Conduct Pilot Adhesion Test
- Mass Production
Tips:
Galvanized Steel:
Must use silane-containing primer.
Aluminum Alloy:
Preferably use chromate-free passivation + epoxy system (avoid hexavalent chromium contamination).

Figure No.1 Matching table for substrate, primer and topcoat
Three Key Performance Criteria for Maximum Coating Bonding
- Adhesion:
Primer to substrate ≥3MPa (pull-off method);Topcoat to primer ≥2MPa - Weather Resistance:
QUV accelerated weathering 500h (340nm UVB), gloss loss <5% - Compatibility:
Primer not dissolved by topcoat solvents (MEK rub test 10s without swelling)
Adhesion Test Methods
Cross-cut Method: ASTM D3359
- Use a cross-cut knife to make a 10×10 grid of 1mm×1mm squares (100 squares in total) on the coating surface.
- Use a soft brush to remove the debris.
- Apply 3M 600 tape (25mm wide) and press it with your finger to ensure full adhesion.
- Rapidly peel off the tape at a 90° angle (at a speed of about 200mm/s).
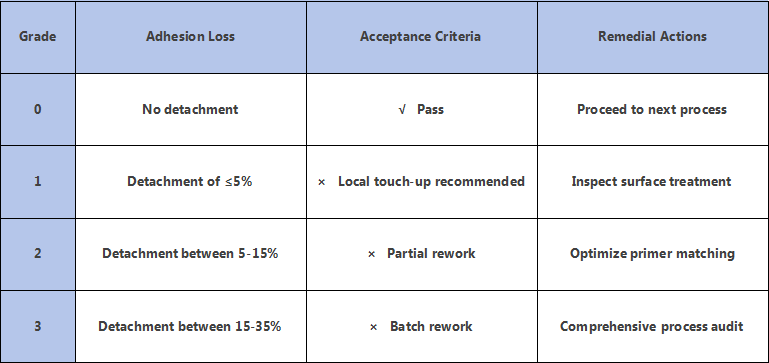
Figure No.2 Cross-cut Test Result Evaluation
Pull-off Method: ISO 4624
- Adhere a cylindrical steel pull-off dolly (20mm diameter) to the coating surface using epoxy adhesive.
- After 24h curing, perform uniform pull-off testing with an adhesion tester at a rate of 1mm/min.
- Record the maximum tensile force value (unit: MPa).
- Steel substrate: ≥5MPa (can lift a 500kg load)
- Galvanized steel: ≥3MPa (can lift a 300kg load)
- Aluminum alloy: ≥6MPa (maintains compliance after thermal cycling)
Weather Resistance Testing Methods
QUV Accelerated Aging: ISO 4892-3
- Light Source: 340nm UVB (simulating solar UV radiation)
- Cycle: 8h light exposure (60℃) + 4h condensation (50℃)
- Total Duration: 500h (equivalent to 1-2 years of outdoor exposure)
- Gloss loss <5% (measured by gloss meter)
- No chalking or cracking (visual inspection)
Salt Spray Test: ASTM B117
- Salt Solution: 5% NaCl (pH 6.5-7.2)
- Temperature: 35±2℃
- Spray Pressure: 0.17MPa
- No blistering (diameter <0.5mm)
- No rust (red rust creepage <2mm at scribed cross)
Compatibility Testing:
Solvent Resistance Test (ISO 4628 - 2)
- On the cured primer film, put 2 drops of the topcoat solvent, for example, methyl ethyl ketone (MEK).
- Cover it with a glass slide. Let it stay for 10 seconds and then wipe it.
- Look for signs of primer swelling or wrinkling.
- If there is no change, the compatibility is considered acceptable.
- In case of swelling or wrinkling, the topcoat type should be changed. For instance, replace nitrocellulose lacquer with polyurethane.
Thermal Cycling Test (ISO 4624)
- Cycle: Start with 1 hour at – 40℃, then 1 hour at 85℃, and repeat this 50 times in total.
- Humidity: Keep it at 95% RH during the humid thermal cycling.
- The cross – cut test result should still be Grade 0.
- Pull-off method refers to the ASTM D3359 adhesion test standard.
- QUV accelerated aging is a common artificial weathering test method in the coatings industry.
- MEK (methyl ethyl ketone) is a standard solvent for cross-cut/cross-hatch adhesion testing in surface pretreatment.
Step 3 : Optimizing Application Techniques for Stronger Coating Bonding
>>> Optimization of Application Process: Thin Layer Uniformity is Key
Spray Parameter Control
Film Thickness:
Primer: 15-25μm (≈2 sheets of A4 paper)
Topcoat: 20-35μm (≈3 sheets)
Spray Gun Pressure: 0.3-0.5MPa
Spray Distance: 20-30cm
Spray Speed: 150-200mm/s
Overlap Ratio: 40-50%
>>> Interlayer Treatment is Critical: Enhancing Interlayer Adhesion
Key Steps
Primer sanding shall be performed using 3M P240 abrasive belts (for mechanical sanding) or non-woven abrasive pads (for manual sanding), ensuring the coating surface achieves a uniform micro-rough texture with Ra 1.5-2.5μm.
Through mechanical abrasion, this process removes surface particulate impurities while creating micro-anchor structures on the coating surface, thereby significantly enhancing the mechanical interlocking strength between the topcoat and primer and laying the adhesion foundation for subsequent coating processes.
- Baked Primer:
Topcoat application must be completed within 24 hours after through drying to avoid interfacial aging. - Air-drying Primer:
Topcoat shall be applied within 2 hours after achieving tack-free surface, leveraging solvent interdiffusion to enhance adhesion.
Interfacial Activation Process Specification
Atmospheric plasma technology (Ar+O₂ gas mixture) shall be used for primer surface activation. After treatment, the surface tension must reach ≥45mN/m, can enabling a 20-30% increase in interlayer adhesion.
It is critical to apply the topcoat within 30 minutes of plasma treatment to prevent secondary surface contamination.
FAQ
Q1: How to resolve orange peel in spraying?
A: Reduce spray gun pressure to 0.3MPa, increase spray speed to 200mm/s, and ensure uniform atomization.
Q2: Blistering caused by insufficient flash-off time
A: Extend flash-off time to 10min (at 25℃) and control humidity below 50%.
Q3: How to prevent condensation during winter application?
A: Preheat substrate to 30℃ and use compressed air with dew point < -20℃ for purging.
Step 4 : Environmental and Curing Control
Temperature and Humidit Control Measures
Winter Construction Control Measures
Use an infrared thermometer to pre – heat the substrate to 30°C, and blow it with dry compressed air with a dew point of < – 20°C. This effectively prevents surface condensation and enhances the coating adhesion.
High – humidity Season Construction Control Measures
Install a refrigeration dehumidifier with a processing capacity of 100L/D. Strictly control the humidity of the working environment below 50%.
When combined with the use of a flash rust inhibitor, it comprehensively prevents the electrochemical corrosion of metal substrates during the painting process.

Figure No.3 Standard Requirements for Temperature and Humidity Control
Never conduct spray painting in an open – air workshop to steer clear of particle contamination.
Curing Degree Monitoring Specification
The curing degree is verified using the solvent rubbing method (in accordance with ASTM D3363 standard) and infrared spectroscopy analysis:
- Methyl Ethyl Ketone (MEK) Rubbing Test: The pass – standard is that there is no dissolution after 50 reciprocal rubbings.
- Infrared Spectroscopy Analysis: By comparing the intensity ratio of the characteristic peak of the epoxy group at 910 cm⁻¹ to the methylene peak at 2930 cm⁻¹ (the ratio should be < 0.05), it is confirmed that the residual amount of the epoxy group is less than 1%.
- Rainy Season Construction Control: When the environmental humidity is > 70%, 3% of an anti – flash rust agent (such as sodium nitrite) should be added, and the leveling time should be extended to 15 minutes. Meanwhile, a humidity sensor is used for real – time monitoring (with an accuracy of ±2% RH).
- Winter Construction Control: The substrate is pre – heated to 30°C through a radiant heating system, and a low – temperature curing agent (such as polyamide – modified amine) is selected to ensure that the curing temperature range is extended to 5 – 10°C.

Figure No.4 Gradient curing curve
FAQ
Q1: How to handle large fluctuations in curing temperature?
A: Use a PID temperature controller (accuracy ±1℃) and avoid frequent oven door opening/closing.
Q2: How to prevent blistering in high humidity environments?
A: Add 0.3% antifoaming agent, extend flash-off time to 10min, and maintain humidity below 50%.
Q3: Why does the coating become brittle after curing?
A: Reduce curing temperature to 160℃ and extend holding time to 30min to prevent over-curing.
Step 5 : Special Substrate Treatment for Enhanced Sheet Metal Coating Adhesion
Special Substrate Treatment Process
To achieve optimal coating adhesion on challenging metals, follow this five-step process:
Identify Substrate Type
First, determine the base material (e.g., stainless steel, aluminum, galvanized steel), as different metals require tailored pretreatment methods.
Surface Activation
Remove oxides and contaminants through chemical etching or mechanical abrasion (e.g., grit blasting to Ra 4-6μm), creating a micro-roughened surface for improved mechanical bonding.
Conversion Coating Treatment
Apply specialized coatings like phosphating (for steel) or chromate-free passivation (for aluminum) to form a corrosion-resistant layer that enhances chemical adhesion between the substrate and subsequent coatings.
Special Primer Application
Select a primer formulated for the specific substrate (e.g., epoxy primers for stainless steel, zinc-rich primers for galvanized steel) to ensure compatibility and create a strong bonding foundation.
Topcoat Application
Finish with a high-performance topcoat (e.g., polyurethane or powder coatings) that matches the primer and meets functional requirements (e.g., marine-grade corrosion resistance or decorative finishes).
Conclusion
The solutions to the poor adhesion of the sheet metal coating need to start from multiple aspects such as surface treatment, paint selection, construction process, environmental control, curing control, and substrate treatment. It is necessary to conduct a thorough investigation one by one, identify the specific causes, and then solve the problems in a targeted manner.
In addition, attention should be paid to the operation specifications and staff training to ensure that each step is carried out correctly.
If you are troubled by the problem of sheet metal coating adhesion and have no solution in mind, feel free to contact us!
We have a professional technical team and rich experience, and can provide you with one-stop solutions. We are capable of diagnosing existing problems, optimizing future production processes, and customizing solutions according to your needs.
You can send an email to [email protected] at any time, and we will reply to you as soon as possible!
>>> Back to Surface Treatment Guide
